
🤖 RobotMCP - AI-Powered Test Automation Bridge




Plain English in, real Robot Framework tests out — with an AI agent doing the typing.
RobotMCP (rf-mcp) is a Model Context Protocol (MCP) server that hands your coding
agent the keys to Robot Framework. The agent discovers keywords, runs steps live
against Browser, Selenium, Appium, Requests, a database, or the desktop, sees what
actually happens, and — once the steps pass — writes you a clean .robot suite.
No guessed locators, no hallucinated keywords, no "works on my machine". Built on
Robot Framework: open source, and always evolving.
New to rf-mcp? Jump to Getting Started. Want the full picture? See the MCP tool reference, configuration, and worked examples.
📺 Video Tutorial
Intro
https://github.com/user-attachments/assets/ad89064f-cab3-4ae6-a4c4-5e8c241301a1
✨ Quick Start
Three commands and a sentence. That's the whole setup.
1️⃣ Install it as a tool
# Everything (Browser, Selenium, Appium, Requests, Database)
uv tool install "rf-mcp[all]"

# ...or just what you need — API testing is pure Python, nothing else to do:
uv tool install "rf-mcp[api]"
This puts a robotmcp command on your PATH. Extras decide which test libraries come
along — see the extras table under Installation.
2️⃣ Wire it into your coding agent
robotmcp init            # detects libraries, prints the MCP config to paste
robotmcp install         # registers rf-mcp into the agents it finds
robotmcp install writes the right MCP config for Claude Code, Codex, GitHub
Copilot, opencode, Gemini CLI, Kilo Code, goose, and Cursor — each in its own
format, without touching your other servers. Prefer to do it by hand? Every agent
accepts:
{ "mcpServers": { "robotmcp": { "command": "robotmcp" } } }
{
  "servers": {
    "robotmcp": {
      "type": "stdio",
      "command": "uv",
      "args": ["run", "-m", "robotmcp.server"],
      "env": { "UV_COMPILE_BYTECODE": "1" }
    }
  }
}
UV_COMPILE_BYTECODE=1precompiles the dependency tree at install time. Without it, the first server launch after an install/upgrade pays several seconds of.pyccompilation before the MCP handshake completes (some clients time out and show the server as unavailable). It is a one-time, install-time cost.
HTTP
Start the MCP server with HTTP transport:
uv run -m robotmcp.server --transport http --host 127.0.0.1 --port 8000
Then configure your AI agent:
{
  "servers": {
    "robotmcp": {
      "type": "http",
      "url": "http://localhost:8000/mcp"
    }
  }
}
Claude Code
claude mcp add rf-mcp -- uvx rf-mcp
3️⃣ Start testing — just ask
Use #robotmcp to create a TestSuite and execute it step wise.
Create a test for https://www.saucedemo.com/ that:
- Logs in to https://www.saucedemo.com/ with valid credentials
- Adds two items to cart
- Completes checkout process
- Verifies success message

Use Selenium Library.
Execute the test suite stepwise and build the final version afterwards.
That's it. rf-mcp walks the agent through discovery, live execution, and suite generation — you just describe the test.
📚 Documentation
| Guide | What's inside |
|---|---|
| Getting Started | Install, wire into your agent, run your first test |
| MCP Tool Reference | Every tool rf-mcp exposes to the agent — parameters, returns, when to reach for it |
| Configuration | Every ROBOTMCP_* environment variable and CLI flag |
| Examples | Copy-pasteable web / API / mobile / desktop / BDD / data-driven walkthroughs |
| Library Plugins | Teach rf-mcp about your own Robot Framework libraries |
| Instruction Templates | Steer the agent's behavior per project |
🛠️ Installation
The Quick Start covers the recommended path (uv tool install). This
section has the extras table, alternative install methods, and the full agent-registration
details.
Extras
Extras decide which Robot Framework libraries come along:
| Extra | Adds | Post-install |
|---|---|---|
api |
RequestsLibrary | none |
web |
SeleniumLibrary + Browser | Selenium: none (Selenium Manager fetches the driver); Browser: robotmcp init --browsers |
mobile |
AppiumLibrary | Appium server (external) |
database |
DatabaseLibrary | a DB driver |
desktop |
PlatynUI native desktop (Windows/Linux) | Python 3.12+ |
frontend |
Django dashboard | — |
memory |
Persistent semantic memory (sqlite-vec + model2vec) | ROBOTMCP_MEMORY_ENABLED=true |
all |
all Robot Framework libraries above (includes desktop on Python 3.12+) |
as above |
Browser Library also needs Playwright browsers — run robotmcp init --browsers (or
rfbrowser init) once, inside rf-mcp's own environment. Node.js is only needed for Browser.
Other install methods
pip install "rf-mcp[all]"                 # pip instead of uv
uv add "rf-mcp[all]" && uv sync           # into an existing uv project

# From source (development)
git clone https://github.com/manykarim/rf-mcp.git && cd rf-mcp
uv sync --all-extras --dev
Docker
Pre-built images (headless for CI, plus a VNC image for visual debugging):
docker pull ghcr.io/manykarim/rf-mcp:latest          # headless
docker run -p 8000:8000 -p 8001:8001 ghcr.io/manykarim/rf-mcp:latest    # HTTP + frontend
docker run -it --rm ghcr.io/manykarim/rf-mcp:latest uv run robotmcp     # STDIO

docker pull ghcr.io/manykarim/rf-mcp-vnc:latest      # X11 desktop over VNC/noVNC
docker run -p 8000:8000 -p 8001:8001 -p 5900:5900 -p 6080:6080 ghcr.io/manykarim/rf-mcp-vnc:latest
Headless bundles Chromium, Firefox ESR and the Playwright browsers. VNC ports: 8000 (MCP HTTP), 8001 (frontend), 5900 (VNC), 6080 (noVNC — http://localhost:6080/vnc.html).
Register into coding agents
robotmcp list                              # supported agents + what's detected/registered
robotmcp install                           # interactive: registers into detected agents
robotmcp install --agents claude-code,codex,gemini
robotmcp install --agents all --scope user
robotmcp install --dry-run                 # show the plan, write nothing
robotmcp uninstall                         # safe, reversible removal
Supported agents (each written in its own file/format, other MCP servers preserved):
Claude Code, OpenAI Codex, GitHub Copilot, opencode, Gemini CLI, Kilo Code, goose,
Cursor (plus pi, listed as planned until its config convention is confirmed).
Uses your project's environment. Install into a project that has its own set-up
environment (uv, poetry, pdm, pipenv, rye, hatch, or a plain .venv) and rf-mcp is wired to
run against that environment — so it sees your project's libraries, keywords and resources,
not just its bundled ones. It launches the resolved command and verifies your libraries are
reachable before writing the config; a blind or broken command is refused. A global
uvx / uv tool install still serves every project with no per-project setup. Point it with
-C <dir>, opt into installing rf-mcp into the project env with --into-project, and run
robotmcp doctor --project-dir <dir> to see which of your libraries the launch reaches.
Scope. Installs default to --scope project (writes into the current project, e.g.
./.mcp.json) where the agent supports it; use --scope user for a global (home-directory)
install. goose only supports user scope; GitHub Copilot only supports project scope.
Safe & reversible. Every change is recorded in a hash-tracked manifest
(~/.local/state/robotmcp/install-manifest.json). robotmcp uninstall removes only entries
unchanged since install — a hand-edited entry is left in place and reported, and unrelated
servers are never touched. Prefer to edit config yourself? Add
{ "mcpServers": { "robotmcp": { "command": "robotmcp" } } }.
🔌 Library Plugins
Extend RobotMCP with custom libraries via the plugin system. Two discovery modes are available:
- Entry points (
robotmcp.library_plugins) for packaged plugins. - Manifest files (JSON) under
.robotmcp/plugins/for workspace overrides.
See the Library Plugin Authoring Guide for detailed instructions and explore the sample plugin in examples/plugins/sample_plugin to get started quickly.
🖥️ Frontend Dashboard
RobotMCP ships with an optional Django-based dashboard that mirrors active sessions, keywords, and tool activity.
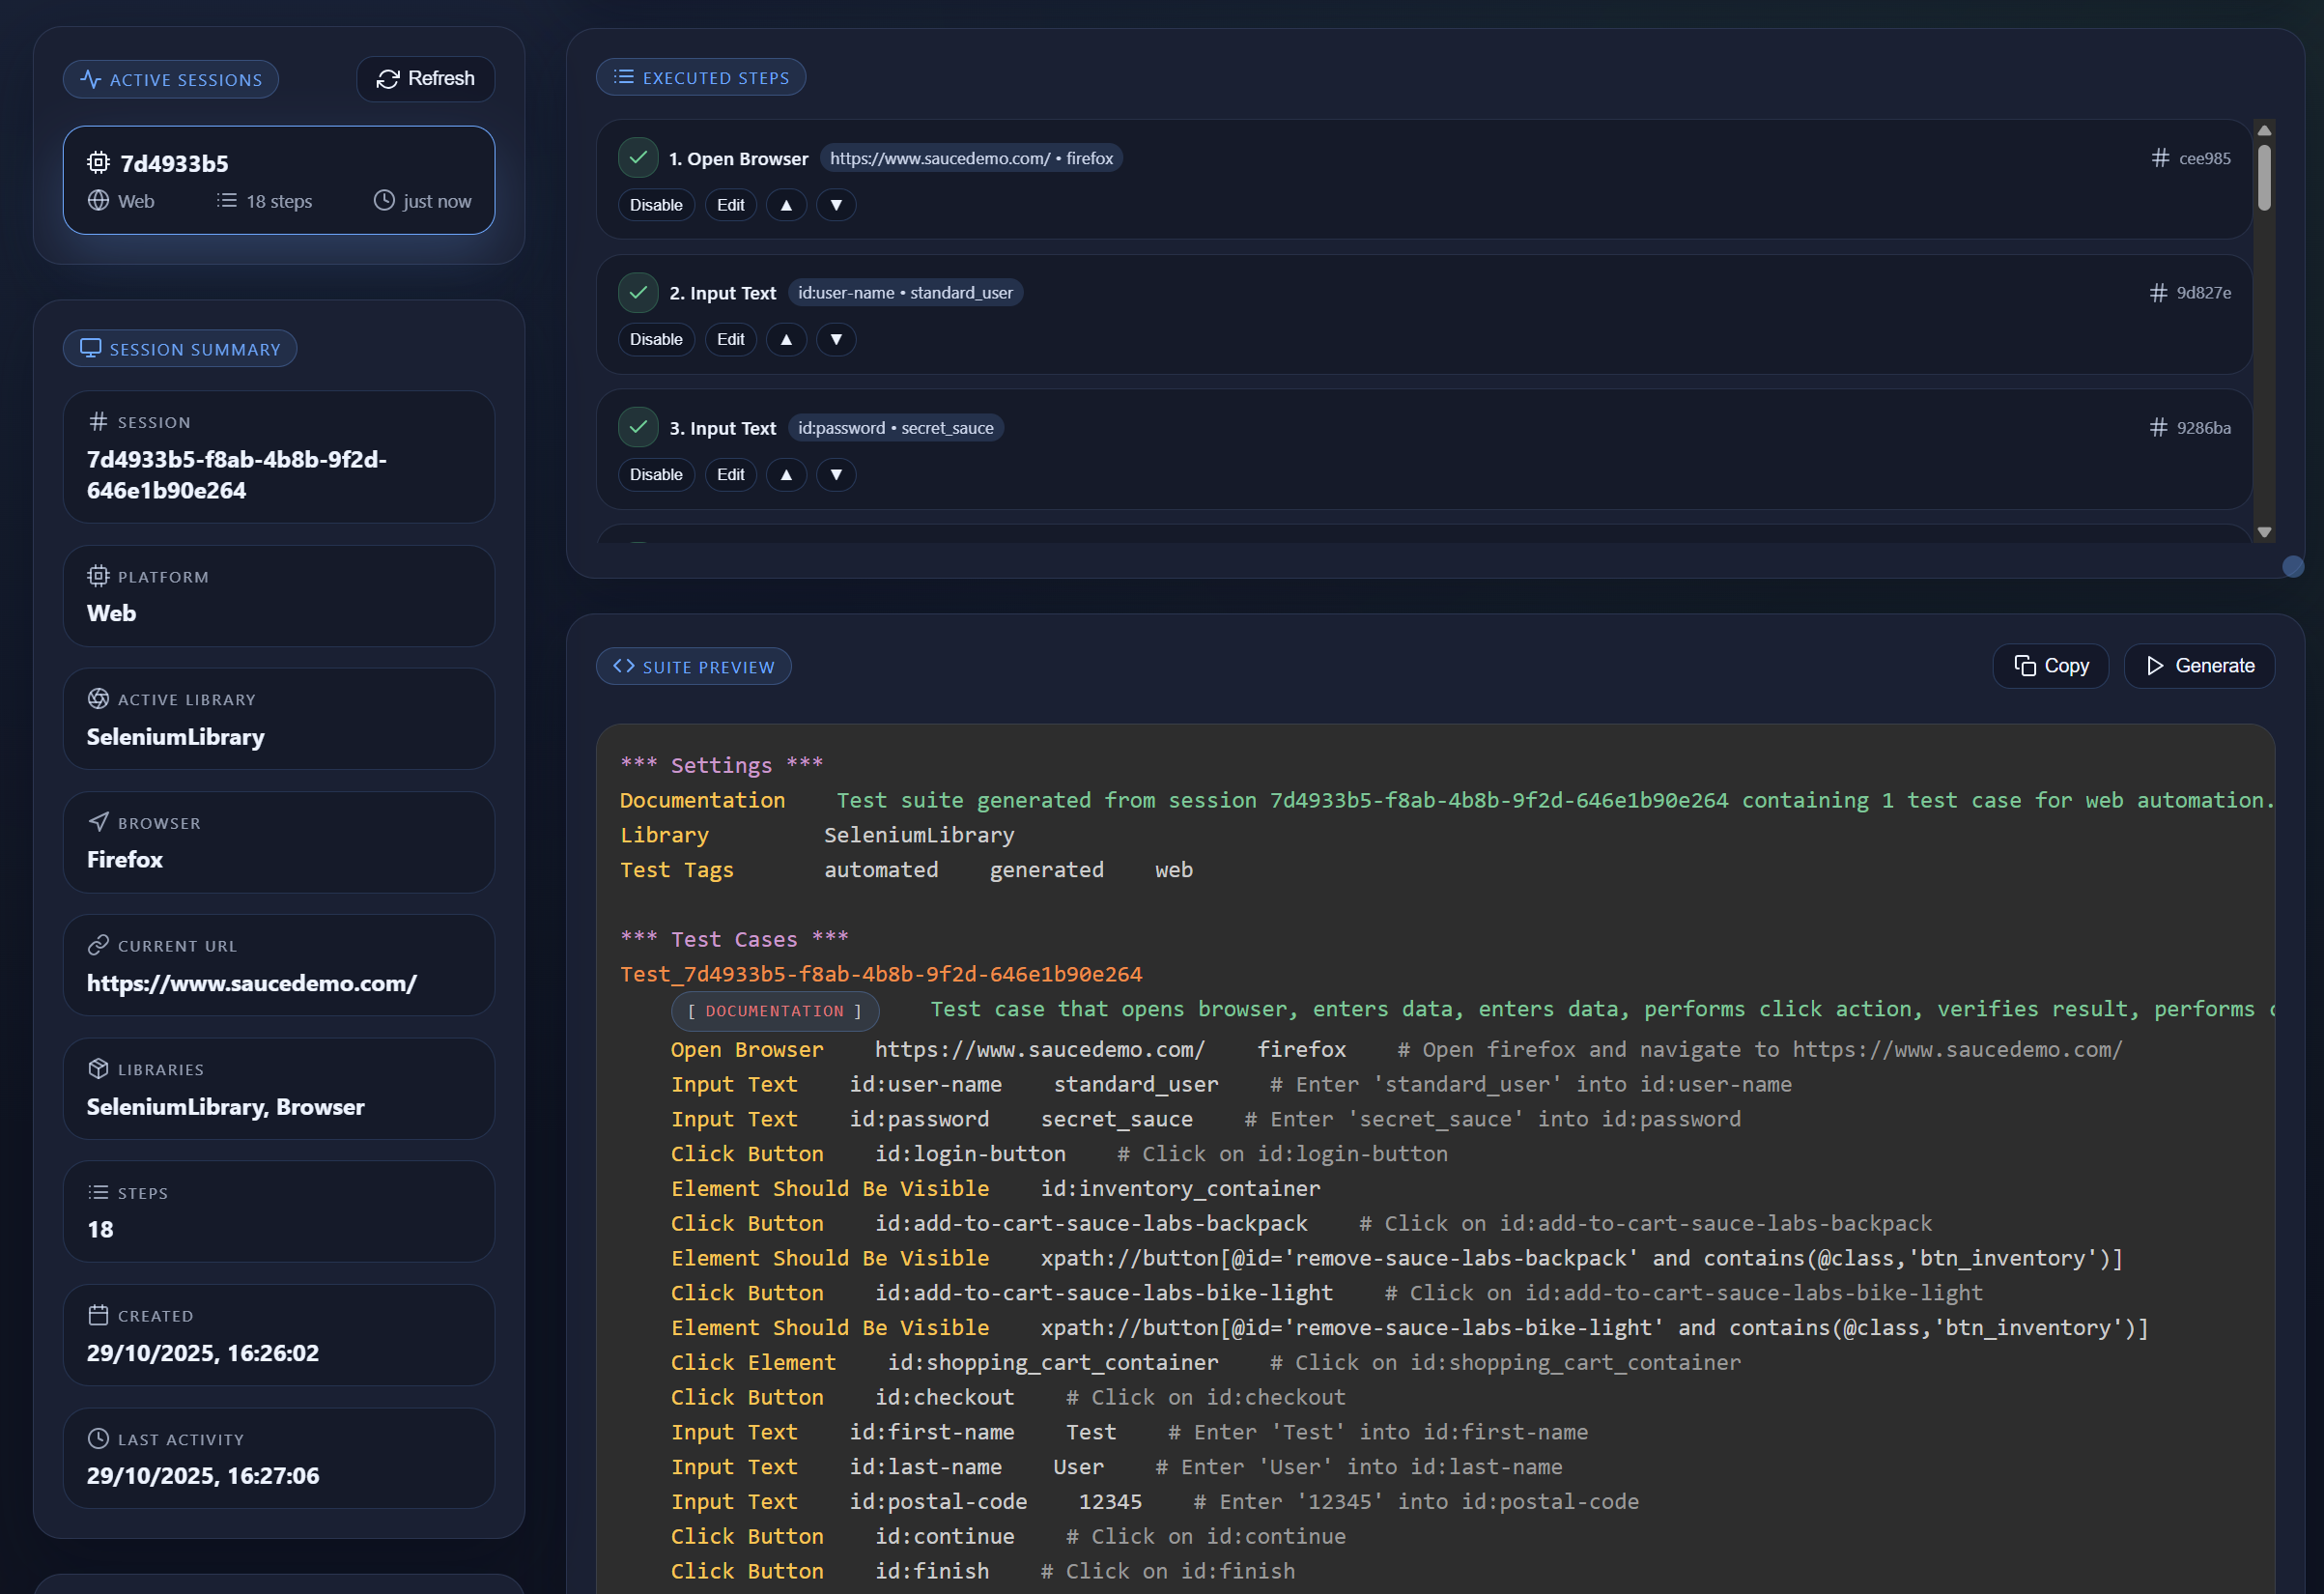
- Install frontend extras
pip install rf-mcp[frontend] - Start the MCP server with the frontend enabled
uv run -m robotmcp.server --with-frontend- Default URL: http://127.0.0.1:8001/
- Quick toggles:
--frontend-host,--frontend-port,--frontend-base-path - Environment equivalents:
ROBOTMCP_ENABLE_FRONTEND=1,ROBOTMCP_FRONTEND_HOST,ROBOTMCP_FRONTEND_PORT,ROBOTMCP_FRONTEND_BASE_PATH,ROBOTMCP_FRONTEND_DEBUG
- Connect your MCP client (Cline, Claude Desktop, etc.) to the same server process—the dashboard automatically streams events once the session is active.
To disable the dashboard for a given run, either omit the flag or pass --without-frontend.
📋 Instruction Templates
RobotMCP sends server-level instructions to LLMs via the MCP initialize response, guiding them to discover keywords before executing them. This significantly reduces failed tool calls and wasted tokens, especially for smaller LLMs.
Configuration
Three environment variables control instruction behavior:
| Variable | Values | Default |
|---|---|---|
ROBOTMCP_INSTRUCTIONS |
off / default / custom |
default |
ROBOTMCP_INSTRUCTIONS_TEMPLATE |
minimal / standard / detailed / browser-focused / api-focused |
standard |
ROBOTMCP_INSTRUCTIONS_FILE |
Path to .txt or .md file |
(none, required when mode=custom) |
ROBOTMCP_LOG_LEVEL |
DEBUG / INFO / WARNING / ERROR — stderr log verbosity |
WARNING |
ROBOTMCP_MCP_LOG_NOTIFICATIONS |
set to 1 to also forward logs to the client as MCP notifications/message (structured, level-tagged) |
(off) |
Output & logging. The MCP stdio channel (stdout) carries only JSON-RPC; all logs and a one-line readiness banner go to stderr. Logging defaults to
WARNINGso the client is not flooded — setROBOTMCP_LOG_LEVEL=INFO/DEBUGto troubleshoot. Logging never blocks execution (it is drained on a background thread with drop-on-overflow), and fd 1 is never redirected out from under the transport.
Built-in Templates
| Template | ~Tokens | Best For |
|---|---|---|
minimal |
~40 | Capable LLMs (Claude Opus, GPT-4) — brief reminder only |
standard |
~400 | Mid-range LLMs (Claude Sonnet, GPT-4o) — balanced workflow guide |
detailed |
~600 | Smaller LLMs (Claude Haiku, GPT-4o-mini) — step-by-step with examples |
browser-focused |
~350 | Web-only testing scenarios |
api-focused |
~300 | API-only testing scenarios |
Example
{
  "servers": {
    "robotmcp": {
      "type": "stdio",
      "command": "uv",
      "args": ["run", "-m", "robotmcp.server"],
      "env": {
        "ROBOTMCP_INSTRUCTIONS": "default",
        "ROBOTMCP_INSTRUCTIONS_TEMPLATE": "detailed"
      }
    }
  }
}
Custom Instructions
Set ROBOTMCP_INSTRUCTIONS=custom and provide a file via ROBOTMCP_INSTRUCTIONS_FILE. Custom files support {available_tools} placeholder substitution. Allowed extensions: .txt, .md, .instruction, .instructions. If the file is missing or fails validation, the server falls back to the standard template automatically.
See docs/INSTRUCTION_TEMPLATES_GUIDE.md for the full guide.
🪝 Debug Attach Bridge
https://github.com/user-attachments/assets/8d87cd6e-c32e-4481-9f37-48b83f69f72f
RobotMCP ships with robotmcp.attach.McpAttach, a lightweight Robot Framework library that exposes the live ExecutionContext over a localhost HTTP bridge. When you debug a suite from VS Code (RobotCode) or another IDE, the bridge lets RobotMCP reuse the in-process variables, imports, and keyword search order instead of creating a separate context.
MCP Server Setup
Example configuration with passed environment variables for Debug Bridge
Using UV
{
  "servers": {
    "RobotMCP": {
      "type": "stdio",
      "command": "uv",
      "args": ["run", "src/robotmcp/server.py"],
      "env": {
        "ROBOTMCP_ATTACH_HOST": "127.0.0.1",
        "ROBOTMCP_ATTACH_PORT": "7317",
        "ROBOTMCP_ATTACH_TOKEN": "change-me",
        "ROBOTMCP_ATTACH_DEFAULT": "auto"
      }
    }
  }
}
Using Docker
{
  "servers": {
    "RobotMCP": {
      "command": "docker",
      "args": ["run", "-i", "--rm", "ghcr.io/manykarim/rf-mcp:latest", "uv", "run", "robotmcp"],
      "env": {
        "ROBOTMCP_ATTACH_HOST": "127.0.0.1",
        "ROBOTMCP_ATTACH_PORT": "7317",
        "ROBOTMCP_ATTACH_TOKEN": "change-me",
        "ROBOTMCP_ATTACH_DEFAULT": "auto"
      }
    }
  }
}
Robot Framework setup
Import the library and start the serve loop inside the suite that you are debugging:
*** Settings ***
Library    robotmcp.attach.McpAttach    token=${DEBUG_TOKEN}

*** Variables ***
${DEBUG_TOKEN}    change-me

*** Test Cases ***
Serve From Debugger
    MCP Serve    port=7317    token=${DEBUG_TOKEN}    mode=blocking    poll_ms=100
    [Teardown]    MCP Stop
MCP Serve port=7317 token=${TOKEN} mode=blocking|step poll_ms=100— starts the HTTP server (if not running) and processes bridge commands. Usemode=stepduring keyword body execution to process exactly one queued request.MCP Stop— signals the serve loop to exit (used from the suite or remotely via RobotMCPattach_stop_bridge).MCP Process Once— processes a single pending request and returns immediately; useful when the suite polls between test actions.MCP Start— alias forMCP Servefor backwards compatibility.
The bridge binds to 127.0.0.1 by default and expects clients to send the shared token in the X-MCP-Token header.
Configure RobotMCP to attach
Start robotmcp.server with attach routing by providing the bridge connection details via environment variables (token must match the suite):
export ROBOTMCP_ATTACH_HOST=127.0.0.1
export ROBOTMCP_ATTACH_PORT=7317          # optional, defaults to 7317
export ROBOTMCP_ATTACH_TOKEN=change-me    # optional, defaults to 'change-me'
export ROBOTMCP_ATTACH_DEFAULT=auto       # auto|force|off (auto routes when reachable)
export ROBOTMCP_ATTACH_STRICT=0           # set to 1/true to fail when bridge is unreachable
uv run python -m robotmcp.server
When ROBOTMCP_ATTACH_HOST is set, execute_step(..., use_context=true) and other context-aware tools first try to run inside the live debug session. Use the new MCP tools to manage the bridge from any agent:
attach_status— reports configuration, reachability, and diagnostics from the bridge (/diagnostics).attach_stop_bridge— sends a/stopcommand, which in turn triggersMCP Stopin the debugged suite.
🎪 Example Workflows
🌐 Web Application Testing (BDD)
Prompt:
Use RobotMCP to create a test suite and execute it step wise.
It shall:

- Open https://demoshop.makrocode.de/
- Add item to cart
- Assert item was added to cart
- Add another item to cart
- Assert another item was added to cart
- Checkout
- Assert checkout was successful

Execute step by step and build final test suite afterwards
Create in BDD style and use Keywords with embedded arguments when applicable
Result: BDD-style Robot Framework test suite with Given/When/Then keywords, embedded arguments, and extracted variables.
🌐 Web Application Testing (Data-Driven)
Prompt:
Use RobotMCP to create a test suite and execute it step wise.
It shall:

- Open https://saucedemo.com
- Login with different user/password combinations
- Assert message or login

Execute step by step and build final test suite afterwards
Create in datadriven style and add multiple test rows with different scenarios
Use Test Template setting in suite
Result: Data-driven Robot Framework test suite with Test Template and parameterized rows for each login scenario.
📱 Mobile App Testing
Prompt:
Use RobotMCP to create a TestSuite and execute it step wise.
It shall:
- Launch app from tests/appium/SauceLabs.apk
- Perform login flow
- Add products to cart
- Complete purchase

Appium server is running at http://localhost:4723
Execute the test suite stepwise and build the final version afterwards.
Result: Mobile test suite with AppiumLibrary keywords and device capabilities.
🔌 API Testing
Prompt:
Read the Restful Booker API documentation at https://restful-booker.herokuapp.com.
Use RobotMCP to create a TestSuite and execute it step wise.
It shall:

- Create a new booking
- Authenticate as admin
- Update the booking
- Delete the booking
- Verify each response

Execute the test suite stepwise and build the final version afterwards.
Result: API test suite using RequestsLibrary with proper error handling.
🧪 XML/Database Testing
Prompt:
Create a xml file with books and authors.
Use RobotMCP to create a TestSuite and execute it step wise.
It shall:
- Parse XML structure
- Validate specific nodes and attributes
- Assert content values
- Check XML schema compliance

Execute the test suite stepwise and build the final version afterwards.
Result: XML processing test using Robot Framework's XML library.
🔍 MCP Tools
rf-mcp exposes its capabilities to the agent as MCP tools, grouped by purpose: planning & orchestration, session & execution, discovery & documentation, observability & diagnostics, suite lifecycle, locator guidance, visual validation, and optional persistent memory.
Full reference: docs/MCP_TOOLS.md — every tool with its parameters, returns, and when to reach for it. Your agent reads these descriptions directly; you rarely need to call them by hand.
🧪 BDD & Data-Driven Test Generation
BDD Style (Given/When/Then)
Prompt:
Use RobotMCP to create a test suite and execute it step wise.
It shall:

- Open https://demoshop.makrocode.de/
- Add item to cart
- Assert item was added to cart
- Add another item to cart
- Assert another item was added to cart
- Checkout
- Assert checkout was successful

Execute step by step and build final test suite afterwards
Create in BDD style and use Keywords with embedded arguments when applicable
Result: RobotMCP executes each step, inspects the DOM between actions, and generates a BDD-style suite with Given/When/Then keywords:
*** Test Cases ***
Demoshop BDD Purchase Workflow
    Given the demoshop is open
    When the user adds the first product to cart
    Then the cart should contain 1 item
    When the user adds the second product to cart
    Then the cart should contain 2 items
    When the user proceeds to checkout
    And the user fills in the checkout form
    And the user places the order
    Then the order confirmation should be displayed

*** Keywords ***
the demoshop is open
    New Browser    chromium
    New Context
    New Page    ${DEMOSHOP_URL}

the user adds the first product to cart
    Click    ${FIRST_PRODUCT_BUTTON}
During stepwise execution, use bdd_group and bdd_intent on execute_step to control how steps are grouped into behavioral keywords. Call build_test_suite(bdd_style=True) at the end.
Data-Driven Templates
Prompt:
Use RobotMCP to create a test suite and execute it step wise.
It shall:

- Open https://saucedemo.com
- Login with different user/password combinations
- Assert message or login

Execute step by step and build final test suite afterwards
Create in datadriven style and add multiple test rows with different scenarios
Use Test Template setting in suite
Result: RobotMCP builds a parameterized suite using Test Template with named data rows:
*** Settings ***
Library         Browser
Test Template   Verify Login

*** Test Cases ***          USERNAME            PASSWORD        EXPECTED
Valid User                  standard_user       secret_sauce    Products
Locked Out User             locked_out_user     secret_sauce    locked out
Invalid Password            standard_user       wrong_pass      Username and password do not match
Use manage_session(action="start_test", template="Verify Login") to set the template keyword, then manage_session(action="add_data_row", test_name="Valid User", args=["standard_user", "secret_sauce", "Products"]) to add each row.
🧠 Small LLM Optimization
RobotMCP includes optimizations for small and medium-sized LLMs (8K-32K context windows) that reduce token overhead and improve tool call accuracy.
Dynamic Tool Profiles
Control which tools are visible to the LLM based on the workflow phase. Smaller models see fewer, more compact tools:
manage_session(action="set_tool_profile", tool_profile="browser_exec")
Profiles: browser_exec, api_exec, discovery, minimal_exec, full. Reduces tool description overhead from ~7,000 to ~1,000 tokens. Can also be set via the ROBOTMCP_TOOL_PROFILE environment variable.
Response Verbosity
Control response detail level to reduce token consumption. Available on most tools via the detail_level parameter:
minimal– Essential output only (60-80% token reduction)standard– Balanced output (default)full– Complete detailed output
Set a default via ROBOTMCP_OUTPUT_VERBOSITY=compact|standard|verbose.
Delta State Responses
get_session_state supports incremental responses that only return sections that changed since the last call:
# First call returns full state (version 1):
get_session_state(session_id="...", sections=["variables", "page_source"])

# Subsequent calls return only what changed:
get_session_state(session_id="...", mode="delta", since_version=1)
In mode="auto" (the default), the server automatically returns delta responses when a previous version exists. This reduces token usage by 50-80% for multi-step workflows where only variables or page content change between steps.
Artifact Externalization
Large outputs (HTML page source, execution logs, stack traces) are automatically externalized into fetchable artifacts instead of being inlined in the response:
# Response includes artifact_id instead of full content:
{"result": "...", "artifact_id": "abc123", "artifact_hint": "Full page source available via fetch_artifact"}

# Fetch when needed:
fetch_artifact(artifact_id="abc123")
This keeps tool responses compact while preserving access to full output on demand.
Intent Action
The intent_action tool provides a library-agnostic entry point for common test actions. Instead of requiring the LLM to know library-specific keyword names and locator syntax, it expresses intent:
intent_action(intent="click", target="text=Login", session_id="...")
intent_action(intent="fill", target="#username", value="testuser", session_id="...")
The server resolves intent + target to the correct keyword and locator format for the session's active library (Browser, SeleniumLibrary, or AppiumLibrary).
Navigate Fallback
When intent_action(intent="navigate") fails because no browser or page is open, the server automatically opens the browser/page and retries:
- Browser Library: executes
New Browser+New Page(or justNew Pageif browser exists) - SeleniumLibrary: executes
Open Browser about:blank chrome
The response includes fallback_applied: true and fallback_steps count. Saves 2-4 tool calls per session.
Batch Execution
The execute_batch tool executes multiple keywords in a single MCP call, reducing N round-trips to 1. Steps can reference results from earlier steps via ${STEP_N} variables:
execute_batch(session_id="...", steps=[
    {"keyword": "Go To", "args": ["https://example.com"]},
    {"keyword": "Get Title", "assign_to": "title"},
    {"keyword": "Should Be Equal", "args": ["${STEP_2}", "Example Domain"]}
], on_failure="recover")
If a step fails, resume_batch lets you insert fix steps and retry from the failure point.
Strict Mode Hints
When a Browser Library keyword fails because the selector matches multiple elements (Playwright strict mode), the error response includes a hint suggesting >> nth=0 (zero-based index) or >> visible=true selector chains, with concrete examples using the actual keyword name and element count.
Type-Constrained Parameters
All action/mode/strategy parameters use Literal types, producing enum constraints in the JSON Schema. This eliminates hallucinated values (e.g., action="setup" instead of action="init"). All values accept case-insensitive input.
Automatic Parameter Coercion
Common small LLM mistakes are corrected server-side:
- JSON-stringified arrays (
"[\"Browser\"]") are parsed to native arrays - Comma-separated strings (
"Browser,BuiltIn") are split into lists - Deprecated keywords (
GET) are mapped to current equivalents (GET On Session)
Instruction Templates
Configurable server-level instructions guide LLMs to follow the "discover-then-act" pattern. Choose a template sized for your LLM's capability — from minimal (~40 tokens) for Claude Opus to detailed (~600 tokens) for Claude Haiku. See Instruction Templates above.
🧠 Persistent Semantic Memory
RobotMCP can learn from past sessions and recall successful patterns, locators, and error fixes — reducing trial-and-error for repeated testing scenarios.
How It Works
Memory is powered by sqlite-vec (vector search) and model2vec (256-dimensional embeddings). When enabled, the server:
- Stores successful step sequences, working locators, and error→fix mappings after each tool call
- Recalls relevant memories and injects them as hints into tool responses (e.g.,
execute_stepfailures include previous fixes,get_session_stateincludes previously successful step patterns) - Learns across sessions — the warm database persists between server restarts
Installation
pip install rf-mcp[memory]
# or
uv pip install rf-mcp[memory]
Configuration
Enable via environment variables:
{
  "servers": {
    "robotmcp": {
      "type": "stdio",
      "command": "uv",
      "args": ["run", "-m", "robotmcp.server"],
      "env": {
        "ROBOTMCP_MEMORY_ENABLED": "true",
        "ROBOTMCP_MEMORY_DB_PATH": "./memory.db"
      }
    }
  }
}
Memory MCP Tools
When memory is enabled, five additional tools become available:
| Tool | Description |
|---|---|
recall_step |
Recall previously successful step sequences. Call before building new test steps to reuse proven patterns. |
recall_fix |
Recall known fixes for an error. Call immediately when execute_step fails before retrying. |
recall_locator |
Recall working locators for a UI element. Call before DOM inspection for familiar elements. |
store_knowledge |
Store domain knowledge (e.g., site structure, auth flows) for future recall. |
get_memory_status |
Check memory availability and statistics at session start. |
Response Augmentation
Memory hints are automatically injected into existing tool responses — no LLM cooperation required:
execute_stepfailures: Previous fixes and working locators are included in the error responseget_session_state: Previously successful step patterns for the scenario are includedanalyze_scenario: Recalled step sequences from past sessions are suggested
All memory lookups have a 50ms timeout to avoid impacting response latency.
Benchmark Results
Tested across 8 scenarios (72 opencode invocations, 3 iterations each) with qwen/qwen3-coder:
| Scenario Type | Best Result | Memory Recall Rate |
|---|---|---|
| Complex web flows (checkout) | -23% calls, -22% tokens | 3/3 iterations |
| Exploration-heavy browsing | -44% calls on best iteration | 3/3 iterations |
| API error recovery | -3% calls ±3% (tightest CI) | 3/3 iterations |
Memory benefits are strongest for complex, multi-step scenarios where past locators and step sequences reduce exploratory tool calls.
⚙️ Configuration
rf-mcp runs with sensible defaults; when you need to tune it, everything is an environment variable away — instruction templates, the attach bridge, output/token economy, memory, the frontend dashboard, PlatynUI desktop safety, and more.
Full reference: docs/CONFIGURATION.md — every
ROBOTMCP_* variable with its accepted values and default, plus the robotmcp
CLI flags and subcommands.
🤝 Contributing
We welcome contributions! Here's how to get started:
- Fork the repository
- Clone your fork locally
- Install development dependencies:
uv sync - Create a feature branch
- Add comprehensive tests for new functionality
- Run tests:
uv run pytest tests/ - Submit a pull request
📝 Changelog
- v0.34.0 – Native desktop automation (
rf-mcp[desktop], PlatynUI, Windows-ready); project-aware installer that uses your project's own libraries; leaner agent instructions; cold-start hang, Windows dry-run deadlock and generated-suite path fixes; tool profiles restored on FastMCP 3 - v0.31.1 – Packaging cleanup (exclude tests/examples from sdist)
- v0.31.0 – BDD/data-driven generation, namespace architecture fixes, persistent memory, 71-88% token reduction
- v0.30.1 – FastMCP 3.x compatibility layer
- v0.30.0 – Small LLM optimization (tool profiles, intent action, response optimization, type constraints)
- v0.29.0 – Instruction templates, multi-test sessions, batch execution, smart timeouts
📄 License
Apache 2.0 License - see LICENSE file for details.
⭐ Star us on GitHub if RobotMCP helps your test automation journey!
Made with ❤️ for the Robot Framework and AI automation community.
No comments yet
Be the first to share your take.