
ContextForge
An open source registry and proxy that federates MCP, A2A, and REST/gRPC APIs with centralized governance, discovery, and observability. Optimizes Agent & Tool calling, and supports plugins.






ContextForge is an open source registry and proxy that federates tools, agents, and APIs into one clean endpoint for your AI clients. It provides centralized governance, discovery, and observability across your AI infrastructure:
- Tools Gateway — MCP, REST, gRPC-to-MCP translation, and TOON compression
- Agent Gateway — A2A protocol, OpenAI-compatible and Anthropic agent routing
- API Gateway — Rate limiting, auth, retries, and reverse proxy for REST services
- Plugin Extensibility — 40+ plugins for additional transports, protocols, and integrations
- Observability — OpenTelemetry tracing with Phoenix, Jaeger, Zipkin, and other OTLP backends
It runs as a fully compliant MCP server, deployable via PyPI or Docker, and scales to multi-cluster environments on Kubernetes with Redis-backed federation and caching.
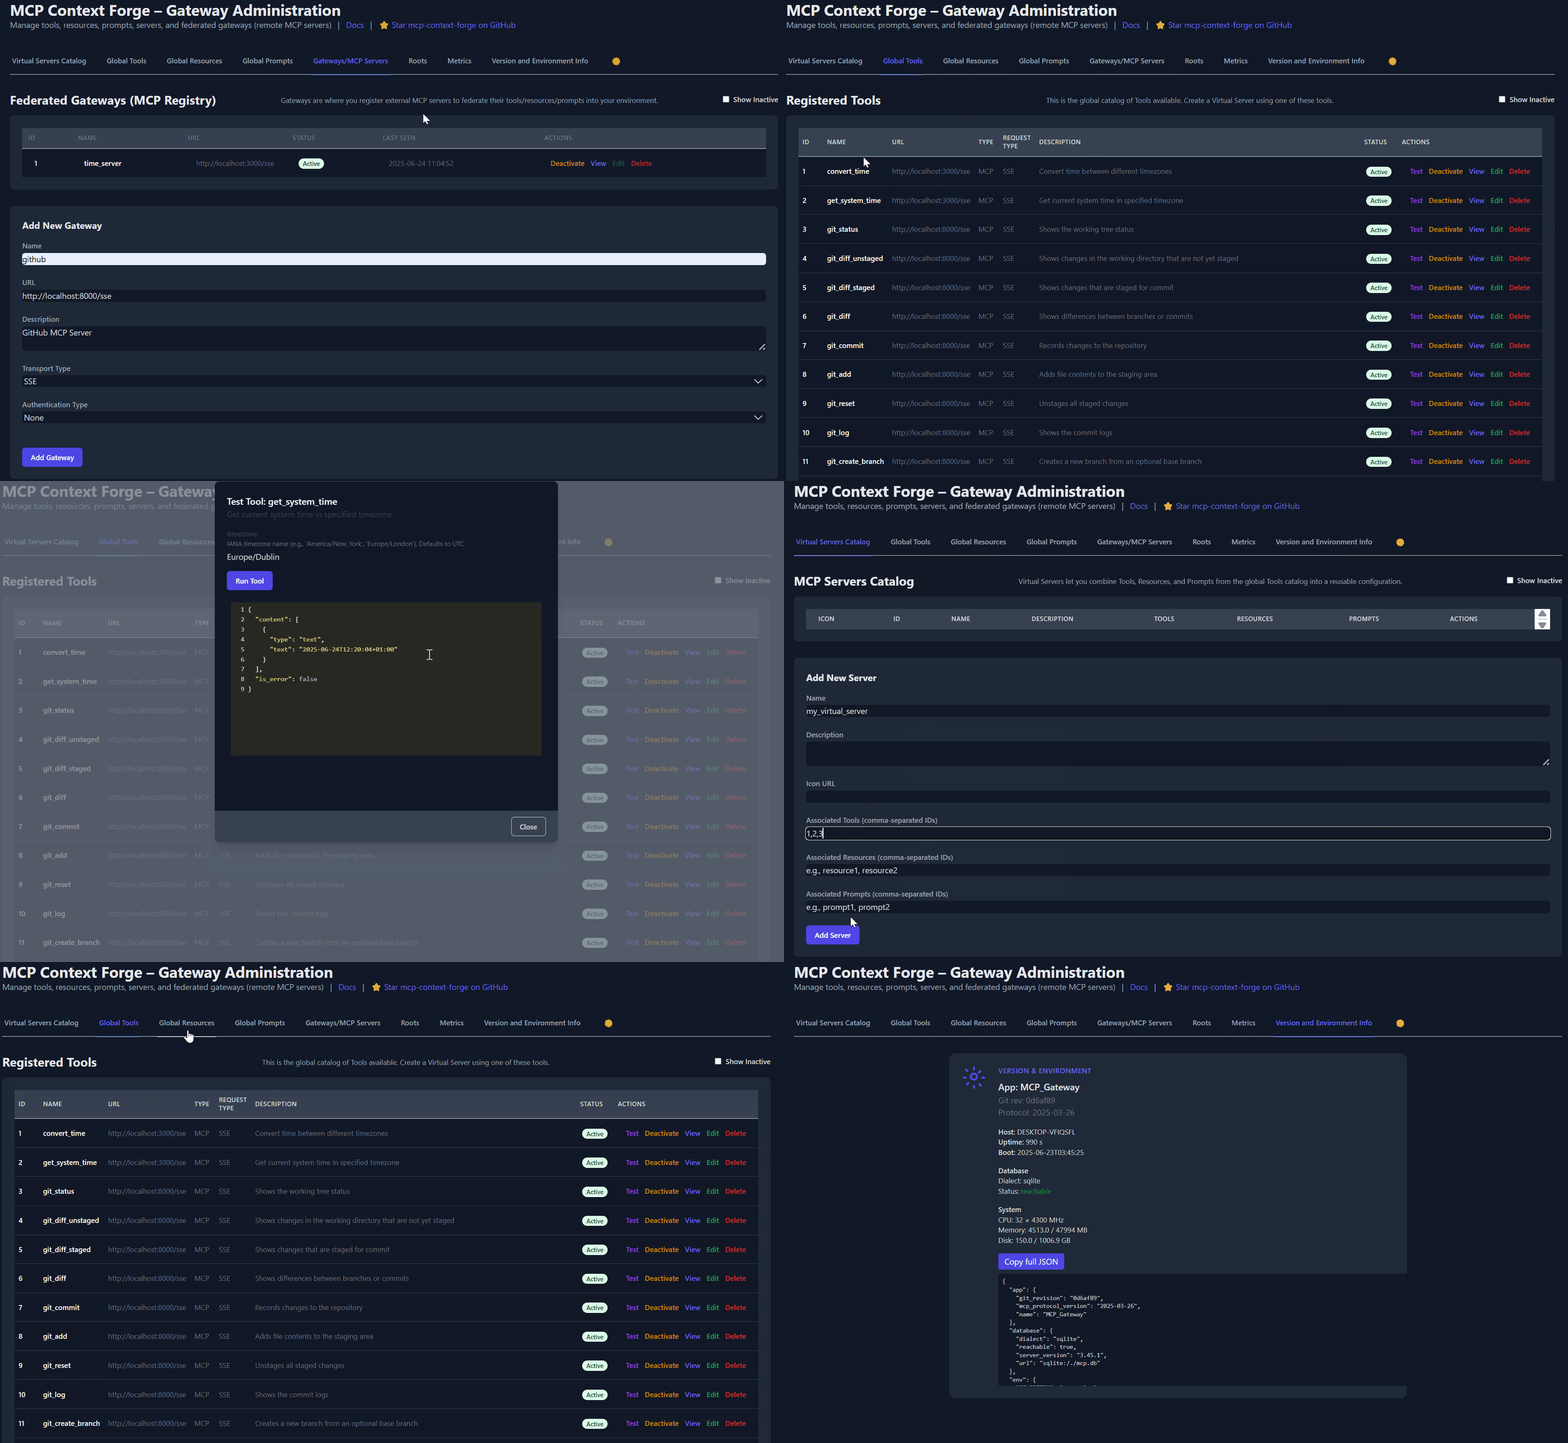
Table of Contents
- Overview & Goals
- Quick Start - PyPI
- Quick Start - Containers
- VS Code Dev Container
- Installation
- Upgrading
- Configuration
- Running
- Cloud Deployment
- API Reference
- Testing
- Project Structure
- Development
- Troubleshooting
- Contributing
📌 Quick Links
| Resource | Description |
|---|---|
| 5-Minute Setup | Get started fast — uvx, Docker, Compose, or local dev |
| Getting Help | Support options, FAQ, community channels |
| Issue Guide | How to file bugs, request features, contribute |
| Full Documentation | Complete guides, tutorials, API reference |
| Deprecations | Deprecated runtime paths and migration guidance |
Overview & Goals
ContextForge is an open source registry and proxy that federates any Model Context Protocol (MCP) server, A2A server, or REST/gRPC API, providing centralized governance, discovery, and observability. It optimizes agent and tool calling, and supports plugins. See the project roadmap for more details.
It currently supports:
- Federation across multiple MCP and REST services
- A2A (Agent-to-Agent) integration for external AI agents (OpenAI, Anthropic, custom)
- gRPC-to-MCP translation via automatic reflection-based service discovery
- Virtualization of legacy APIs as MCP-compliant tools and servers
- Transport over HTTP, JSON-RPC, WebSocket, SSE (with configurable keepalive), stdio and streamable-HTTP
- An Admin UI for real-time management, configuration, and log monitoring (with airgapped deployment support)
- Built-in auth, retries, and rate-limiting with user-scoped OAuth tokens and unconditional X-Upstream-Authorization header support
- OpenTelemetry observability with Phoenix, Jaeger, Zipkin, and other OTLP backends
- Scalable deployments via Docker or PyPI, Redis-backed caching, and multi-cluster federation

For a list of upcoming features, check out the ContextForge Roadmap
- Federates any MCP server or REST API
- Lets you choose your MCP protocol version (e.g.,
2025-11-25) - Exposes a single, unified interface for diverse backends
- Wraps non-MCP services as virtual MCP servers
- Registers tools, prompts, and resources with minimal configuration
- gRPC-to-MCP translation via server reflection protocol
- Automatic service discovery and method introspection
-
Adapts REST APIs into tools with:
- Automatic JSON Schema extraction
- Support for headers, tokens, and custom auth
- Retry, timeout, and rate-limit policies
- Prompts: Jinja2 templates, multimodal support, rollback/versioning
- Resources: URI-based access, MIME detection, caching, SSE updates
- Tools: Native or adapted, with input validation and concurrency controls
- Admin UI built with HTMX 2.0.3 (bundled) + Alpine.js
- Real-time log viewer with filtering, search, and export capabilities
- Auth: Basic, JWT, or custom schemes
- Structured logs, health endpoints, metrics
- 7,000+ tests, Makefile targets, live reload, pre-commit hooks
- Vendor-agnostic tracing with OpenTelemetry (OTLP) protocol support
- Multiple backend support: Phoenix (LLM-focused), Jaeger, Zipkin, Tempo, DataDog, New Relic
- Distributed tracing across federated gateways and services
- Automatic instrumentation of tools, prompts, resources, and gateway operations
- LLM-specific metrics: Token usage, costs, model performance
- Zero-overhead when disabled with graceful degradation
See Observability Documentation for setup guides with Phoenix, Jaeger, and other backends.
Quick Start - PyPI
ContextForge is published on PyPI as mcp-contextforge-gateway.
⚠️
JWT_SECRET_KEYandAUTH_ENCRYPTION_SECRETare required in every environment — including local development. The gateway will not start without them. Generate real secrets withpython3 -m mcpgateway.scripts.init_secretsbefore first run.
TLDR — single command using uv:
# 1️⃣ Generate secure secrets (creates .env.secrets)
python3 -m mcpgateway.scripts.init_secrets
# 2️⃣ Export the generated values
export JWT_SECRET_KEY="$(grep '^JWT_SECRET_KEY=' .env.secrets | cut -d= -f2)"
export AUTH_ENCRYPTION_SECRET="$(grep '^AUTH_ENCRYPTION_SECRET=' .env.secrets | cut -d= -f2)"
# 3️⃣ Start the gateway
JWT_SECRET_KEY="$JWT_SECRET_KEY" \
AUTH_ENCRYPTION_SECRET="$AUTH_ENCRYPTION_SECRET" \
MCPGATEWAY_UI_ENABLED=true \
MCPGATEWAY_ADMIN_API_ENABLED=true \
[email protected] \
uvx --from mcp-contextforge-gateway mcpgateway --host 0.0.0.0 --port 4444
- Python ≥ 3.11
- curl + jq - only for the last smoke-test step
1 - Install & run (copy-paste friendly)
# 1️⃣ Create an isolated env and install from PyPI
mkdir mcpgateway && cd mcpgateway
python3 -m venv .venv && source .venv/bin/activate
pip install --upgrade pip
pip install mcp-contextforge-gateway
# 2️⃣ Download .env.example and generate real secrets
curl -O https://raw.githubusercontent.com/IBM/mcp-context-forge/main/.env.example
cp .env.example .env
# Generate cryptographically secure secrets into .env.secrets
python3 -m mcpgateway.scripts.init_secrets
# Patch the generated secrets into .env (replaces __REPLACE_ME__ placeholders)
python3 -m mcpgateway.scripts.init_secrets --patch-env .env
# 3️⃣ Start the gateway
mcpgateway --host 0.0.0.0 --port 4444 &
# 4️⃣ Generate a bearer token and smoke-test
export JWT_SECRET_KEY=$(grep '^JWT_SECRET_KEY=' .env | cut -d= -f2)
export MCPGATEWAY_BEARER_TOKEN=$(python3 -m mcpgateway.utils.create_jwt_token \
--username [email protected] --exp 10080 --secret "$JWT_SECRET_KEY")
curl -s -H "Authorization: Bearer $MCPGATEWAY_BEARER_TOKEN" \
http://127.0.0.1:4444/version | jq
# 1️⃣ Isolated env + install from PyPI
mkdir mcpgateway ; cd mcpgateway
python3 -m venv .venv ; .\.venv\Scripts\Activate.ps1
pip install --upgrade pip
pip install mcp-contextforge-gateway
# 2️⃣ Download .env.example and generate real secrets
Invoke-WebRequest -Uri "https://raw.githubusercontent.com/IBM/mcp-context-forge/main/.env.example" -OutFile ".env.example"
Copy-Item .env.example .env
# Generate cryptographically secure secrets into .env.secrets
python3 -m mcpgateway.scripts.init_secrets
# Patch the generated secrets into .env (replaces __REPLACE_ME__ placeholders)
python3 -m mcpgateway.scripts.init_secrets --patch-env .env
# 3️⃣ Launch the gateway
mcpgateway.exe --host 0.0.0.0 --port 4444
# 4️⃣ Bearer token and smoke-test
$Env:JWT_SECRET_KEY = (Get-Content .env | Select-String '^JWT_SECRET_KEY=').ToString().Split('=')[1]
$Env:MCPGATEWAY_BEARER_TOKEN = python3 -m mcpgateway.utils.create_jwt_token `
--username [email protected] --exp 10080 --secret $Env:JWT_SECRET_KEY
curl -s -H "Authorization: Bearer $Env:MCPGATEWAY_BEARER_TOKEN" `
http://127.0.0.1:4444/version | jq
# 1️⃣ Isolated env + install from PyPI using uv
mkdir mcpgateway ; cd mcpgateway
uv venv
.\.venv\Scripts\activate
uv pip install mcp-contextforge-gateway
# Continue with steps 2️⃣-4️⃣ above...
Copy .env.example to .env and tweak any of the settings (or use them as env variables).
# 1️⃣ Spin up the sample MCP time server using mcpgateway.translate & docker (replace docker with podman if needed)
python3 -m mcpgateway.translate \
--stdio "docker run --rm -i ghcr.io/ibm/fast-time-server:latest -transport=stdio" \
--expose-sse \
--port 8003
# Or using the official mcp-server-git using uvx:
pip install uv # to install uvx, if not already installed
python3 -m mcpgateway.translate --stdio "uvx mcp-server-git" --expose-sse --port 9000
# NEW: Expose via multiple protocols simultaneously!
python3 -m mcpgateway.translate \
--stdio "uvx mcp-server-git" \
--expose-sse \
--expose-streamable-http \
--port 9000
# Now accessible via both /sse (SSE) and /mcp (streamable HTTP) endpoints
# 2️⃣ Register it with the gateway
curl -s -X POST -H "Authorization: Bearer $MCPGATEWAY_BEARER_TOKEN" \
-H "Content-Type: application/json" \
-d '{"name":"fast_time","url":"http://localhost:8003/sse"}' \
http://localhost:4444/gateways
# 3️⃣ Verify tool catalog
curl -s -H "Authorization: Bearer $MCPGATEWAY_BEARER_TOKEN" http://localhost:4444/tools | jq
# 4️⃣ Create a *virtual server* bundling those tools. Use the ID of tools from the tool catalog (Step #3) and pass them in the associatedTools list.
curl -s -X POST -H "Authorization: Bearer $MCPGATEWAY_BEARER_TOKEN" \
-H "Content-Type: application/json" \
-d '{"server":{"name":"time_server","description":"Fast time tools","associated_tools":[<ID_OF_TOOLS>]}}' \
http://localhost:4444/servers | jq
# Example curl
curl -s -X POST -H "Authorization: Bearer $MCPGATEWAY_BEARER_TOKEN" \
-H "Content-Type: application/json" \
-d '{"server":{"name":"time_server","description":"Fast time tools","associated_tools":["6018ca46d32a4ac6b4c054c13a1726a2"]}}' \
http://localhost:4444/servers | jq
# 5️⃣ List servers (should now include the UUID of the newly created virtual server)
curl -s -H "Authorization: Bearer $MCPGATEWAY_BEARER_TOKEN" http://localhost:4444/servers | jq
# 6️⃣ Client HTTP endpoint. Inspect it interactively with the MCP Inspector CLI (or use any MCP client)
npx -y @modelcontextprotocol/inspector
# Transport Type: Streamable HTTP, URL: http://localhost:4444/servers/UUID_OF_SERVER_1/mcp, Header Name: "Authorization", Bearer Token
export MCP_AUTH="Bearer ${MCPGATEWAY_BEARER_TOKEN}"
export MCP_SERVER_URL=http://localhost:4444/servers/UUID_OF_SERVER_1/mcp
python3 -m mcpgateway.wrapper # Ctrl-C to exit
You can also run it with uv or inside Docker/Podman - see the Containers section above.
In MCP Inspector, define MCP_AUTH and MCP_SERVER_URL env variables, and select python3 as the Command, and -m mcpgateway.wrapper as Arguments.
echo $PWD/.venv/bin/python3 # Using the Python3 full path ensures you have a working venv
export MCP_SERVER_URL='http://localhost:4444/servers/UUID_OF_SERVER_1/mcp'
export MCP_AUTH="Bearer ${MCPGATEWAY_BEARER_TOKEN}"
npx -y @modelcontextprotocol/inspector
or
Pass the url and auth as arguments (no need to set environment variables)
npx -y @modelcontextprotocol/inspector
command as `python`
Arguments as `-m mcpgateway.wrapper --url "http://localhost:4444/servers/UUID_OF_SERVER_1/mcp" --auth "Bearer <your token>"`
When using a MCP Client such as Claude with stdio:
{
  "mcpServers": {
    "mcpgateway-wrapper": {
      "command": "python",
      "args": ["-m", "mcpgateway.wrapper"],
      "env": {
        "MCP_AUTH": "Bearer your-token-here",
        "MCP_SERVER_URL": "http://localhost:4444/servers/UUID_OF_SERVER_1",
        "MCP_TOOL_CALL_TIMEOUT": "120"
      }
    }
  }
}
Quick Start - Containers
Use the official OCI image from GHCR with Docker or Podman. Please note: Currently, arm64 is not supported on production. If you are e.g. running on MacOS with Apple Silicon chips (M1, M2, etc), you can run the containers using Rosetta or install via PyPi instead.
🚀 Quick Start - Docker Compose
Important:
docker compose up -ddoes not build the gateway image locally by default — it uses the pre-built image from GHCR. The compose file includes abuild:block as a fallback, but local builds require a hermetic wheel closure that is only produced by the CI pipeline. If you see acryptographyor dependency resolution error during build, you are hitting this — just pull the image instead (step 2 below handles this automatically).You also must have a
.envfile with real secrets before runningdocker compose up -d. The gateway will not start with placeholder values.
Get a full stack running with PostgreSQL and Redis:
# 1️⃣  Clone the repository
git clone https://github.com/IBM/mcp-context-forge.git
cd mcp-context-forge

# 2️⃣  Set up .env with real secrets AND pull the pre-built images
cp .env.example .env
python3 -m mcpgateway.scripts.init_secrets --patch-env .env
# .env now has strong JWT_SECRET_KEY and AUTH_ENCRYPTION_SECRET

# Pull pre-built images from GHCR (avoids local build entirely)
docker pull ghcr.io/ibm/mcp-context-forge:latest
echo 'IMAGE_LOCAL=ghcr.io/ibm/mcp-context-forge:latest' >> .env

# Build only the nginx image (small, local-only, builds in seconds)
docker compose build nginx

# 3️⃣  Start the full stack
docker compose up -d

# 4️⃣  Check status
docker compose ps

# 5️⃣  View logs
docker compose logs -f gateway

# 6️⃣  Access Admin UI: http://localhost:8080/admin
#     Login: PLATFORM_ADMIN_EMAIL / PLATFORM_ADMIN_PASSWORD (from .env)

# 7️⃣  Generate an API token
export JWT_SECRET_KEY=$(grep '^JWT_SECRET_KEY=' .env | cut -d= -f2)
docker compose exec gateway python3 -m mcpgateway.utils.create_jwt_token \
  --username [email protected] --exp 10080 --secret "$JWT_SECRET_KEY"
What you get:
- 🗄️ PostgreSQL - Production-ready database with 55+ tables
- 🚀 ContextForge - Full-featured gateway with Admin UI
- 📊 Redis - High-performance caching and session storage
- 🔧 Admin Tools - pgAdmin, Redis Insight for database management
- 🌐 Nginx Proxy - Caching reverse proxy on port 8080
Enable HTTPS (optional):
# Start with TLS enabled (auto-generates self-signed certs)
make compose-tls

# Access via HTTPS: https://localhost:8443/admin

# Or bring your own certificates:
# Unencrypted key:
mkdir -p certs
cp your-cert.pem certs/cert.pem && cp your-key.pem certs/key.pem
make compose-tls

# Passphrase-protected key:
mkdir -p certs
cp your-cert.pem certs/cert.pem && cp your-encrypted-key.pem certs/key-encrypted.pem
echo "KEY_FILE_PASSWORD=your-passphrase" >> .env
make compose-tls
☸️ Quick Start - Helm (Kubernetes)
Deploy to Kubernetes with enterprise-grade features:
# Add Helm repository (when available)
# helm repo add mcp-context-forge https://ibm.github.io/mcp-context-forge
# helm repo update

# For now, use local chart
git clone https://github.com/IBM/mcp-context-forge.git
cd mcp-context-forge/charts/mcp-stack

# Generate secrets first
python3 -m mcpgateway.scripts.init_secrets
JWT_SECRET=$(grep '^JWT_SECRET_KEY=' .env.secrets | cut -d= -f2)
ENC_SECRET=$(grep '^AUTH_ENCRYPTION_SECRET=' .env.secrets | cut -d= -f2)

# Install with PostgreSQL (default)
# IMPORTANT: replace <strong-password> with a real password — do not use 'changeme' in production
helm install mcp-gateway . \
  --set mcpContextForge.secret.PLATFORM_ADMIN_EMAIL=admin@yourcompany.com \
  --set mcpContextForge.secret.PLATFORM_ADMIN_PASSWORD=<strong-password> \
  --set mcpContextForge.secret.BASIC_AUTH_PASSWORD=<strong-password> \
  --set "mcpContextForge.secret.JWT_SECRET_KEY=${JWT_SECRET}" \
  --set "mcpContextForge.secret.AUTH_ENCRYPTION_SECRET=${ENC_SECRET}"

# Check deployment status
kubectl get pods -l app.kubernetes.io/name=mcp-context-forge

# Port forward to access Admin UI
kubectl port-forward svc/mcp-gateway-mcp-context-forge 4444:80
# Access: http://localhost:4444/admin

# Generate API token (reads JWT_SECRET_KEY from the pod's environment)
kubectl exec deployment/mcp-gateway-mcp-context-forge -- \
  python3 -m mcpgateway.utils.create_jwt_token \
  --username [email protected] --exp 10080 --secret "${JWT_SECRET}"
SSRF note: Helm defaults to strict SSRF settings (
SSRF_ALLOW_PRIVATE_NETWORKS=false). If you register in-cluster tool URLs (for example fast-time or fast-test services), allow only your cluster CIDRs viamcpContextForge.config.SSRF_ALLOWED_NETWORKSor, for local-only benchmark setups, temporarily setSSRF_ALLOW_PRIVATE_NETWORKS=true. Seedocs/docs/manage/configuration.md#ssrf-protectionanddocs/docs/deployment/helm.md.
Enterprise Features:
- 🔄 Auto-scaling - HPA with CPU/memory targets
- 🗄️ Database Choice - PostgreSQL (prod), SQLite (dev)
- 📊 Observability - Prometheus metrics, OpenTelemetry tracing
- 🔒 Security - RBAC, network policies, secret management
- 🚀 High Availability - Multi-replica deployments with Redis clustering
- 📈 Monitoring - Built-in Grafana dashboards and alerting
🐳 Docker (Single Container)
# Generate secrets first (creates .env.secrets)
python3 -m mcpgateway.scripts.init_secrets
export JWT_SECRET_KEY="$(grep '^JWT_SECRET_KEY=' .env.secrets | cut -d= -f2)"
export AUTH_ENCRYPTION_SECRET="$(grep '^AUTH_ENCRYPTION_SECRET=' .env.secrets | cut -d= -f2)"

docker run -d --name mcpgateway \
  -p 4444:4444 \
  -e MCPGATEWAY_UI_ENABLED=true \
  -e MCPGATEWAY_ADMIN_API_ENABLED=true \
  -e HOST=0.0.0.0 \
  -e JWT_SECRET_KEY="${JWT_SECRET_KEY}" \
  -e AUTH_ENCRYPTION_SECRET="${AUTH_ENCRYPTION_SECRET}" \
  -e AUTH_REQUIRED=true \
  -e [email protected] \
  -e PLATFORM_ADMIN_PASSWORD=<strong-password> \
  -e PLATFORM_ADMIN_FULL_NAME="Platform Administrator" \
  -e DATABASE_URL=sqlite:///./mcp.db \
  -e SECURE_COOKIES=false \
  ghcr.io/ibm/mcp-context-forge:latest

# Tail logs
docker logs -f mcpgateway

# Generate API token (using the same secret)
docker run --rm -it \
  -e JWT_SECRET_KEY="${JWT_SECRET_KEY}" \
  ghcr.io/ibm/mcp-context-forge:latest \
  python3 -m mcpgateway.utils.create_jwt_token \
  --username [email protected] --exp 10080 --secret "${JWT_SECRET_KEY}"
Browse to http://localhost:4444/admin and login with PLATFORM_ADMIN_EMAIL / PLATFORM_ADMIN_PASSWORD.
Persist SQLite database:
mkdir -p $(pwd)/data && touch $(pwd)/data/mcp.db && chmod 777 $(pwd)/data
docker run -d --name mcpgateway --restart unless-stopped \
  -p 4444:4444 -v $(pwd)/data:/data \
  -e DATABASE_URL=sqlite:////data/mcp.db \
  -e MCPGATEWAY_UI_ENABLED=true -e MCPGATEWAY_ADMIN_API_ENABLED=true \
  -e HOST=0.0.0.0 -e JWT_SECRET_KEY="${JWT_SECRET_KEY}" \
  -e AUTH_ENCRYPTION_SECRET="${AUTH_ENCRYPTION_SECRET}" \
  -e [email protected] -e PLATFORM_ADMIN_PASSWORD=<strong-password> \
  ghcr.io/ibm/mcp-context-forge:latest
Host networking (access local MCP servers):
docker run -d --name mcpgateway --network=host \
  -v $(pwd)/data:/data -e DATABASE_URL=sqlite:////data/mcp.db \
  -e MCPGATEWAY_UI_ENABLED=true -e HOST=0.0.0.0 -e PORT=4444 \
  -e JWT_SECRET_KEY="${JWT_SECRET_KEY}" -e AUTH_ENCRYPTION_SECRET="${AUTH_ENCRYPTION_SECRET}" \
  ghcr.io/ibm/mcp-context-forge:latest
Airgapped deployment (no internet):
docker build -f Containerfile -t mcpgateway:airgapped .
docker run -d --name mcpgateway -p 4444:4444 \
  -e MCPGATEWAY_UI_AIRGAPPED=true -e MCPGATEWAY_UI_ENABLED=true \
  -e HOST=0.0.0.0 -e JWT_SECRET_KEY="${JWT_SECRET_KEY}" \
  -e AUTH_ENCRYPTION_SECRET="${AUTH_ENCRYPTION_SECRET}" \
  mcpgateway:airgapped
🦭 Podman (rootless-friendly)
podman run -d --name mcpgateway \
  -p 4444:4444 -e HOST=0.0.0.0 -e DATABASE_URL=sqlite:///./mcp.db \
  ghcr.io/ibm/mcp-context-forge:1.0.0-RC-3
Persist SQLite:
mkdir -p $(pwd)/data && chmod 777 $(pwd)/data
podman run -d --name mcpgateway --restart=on-failure \
  -p 4444:4444 -v $(pwd)/data:/data \
  -e DATABASE_URL=sqlite:////data/mcp.db \
  ghcr.io/ibm/mcp-context-forge:1.0.0-RC-3
Host networking:
podman run -d --name mcpgateway --network=host \
  -v $(pwd)/data:/data -e DATABASE_URL=sqlite:////data/mcp.db \
  ghcr.io/ibm/mcp-context-forge:1.0.0-RC-3
-
.env files - Put all the
-e FOO=lines into a file and replace them with--env-file .env. See the provided .env.example for reference. -
Pinned tags - Use an explicit version (e.g.
1.0.0-RC-3) instead oflatestfor reproducible builds. -
JWT tokens - Generate one in the running container (reads the secret from the container environment):
docker exec mcpgateway python3 -m mcpgateway.utils.create_jwt_token \ --username [email protected] --exp 10080 --secret "${JWT_SECRET_KEY}" -
Upgrades - Stop, remove, and rerun with the same
-v $(pwd)/data:/datamount; your DB and config stay intact.
curl -s -H "Authorization: Bearer $MCPGATEWAY_BEARER_TOKEN" \
     http://localhost:4444/health | jq
curl -s -H "Authorization: Bearer $MCPGATEWAY_BEARER_TOKEN" \
     http://localhost:4444/tools | jq
curl -s -H "Authorization: Bearer $MCPGATEWAY_BEARER_TOKEN" \
     http://localhost:4444/version | jq
The mcpgateway.wrapper lets you connect to the gateway over stdio while keeping JWT authentication. You should run this from the MCP Client. The example below is just for testing.
# JWT_SECRET_KEY must be set — see "Docker (Single Container)" for how to generate it
export MCPGATEWAY_BEARER_TOKEN=$(python3 -m mcpgateway.utils.create_jwt_token \
  --username [email protected] --exp 10080 --secret "${JWT_SECRET_KEY}")
export MCP_AUTH="Bearer ${MCPGATEWAY_BEARER_TOKEN}"
export MCP_SERVER_URL='http://localhost:4444/servers/UUID_OF_SERVER_1/mcp'
export MCP_TOOL_CALL_TIMEOUT=120
export MCP_WRAPPER_LOG_LEVEL=DEBUG  # or OFF to disable logging

docker run --rm -i \
  -e MCP_AUTH="${MCP_AUTH}" \
  -e MCP_SERVER_URL=http://host.docker.internal:4444/servers/UUID_OF_SERVER_1/mcp \
  -e MCP_TOOL_CALL_TIMEOUT=120 \
  -e MCP_WRAPPER_LOG_LEVEL=DEBUG \
  ghcr.io/ibm/mcp-context-forge:latest \
  python3 -m mcpgateway.wrapper
Quick Start: VS Code Dev Container
Clone the repo and open in VS Code—it will detect .devcontainer and prompt to "Reopen in Container". The container includes Python 3.11, Docker CLI, and all project dependencies.
For detailed setup, workflows, and GitHub Codespaces instructions, see Developer Onboarding.
Installation
make venv install-dev      # create .venv + install deps + build Admin UI
make serve                 # gunicorn on :4444
Rust workspace note:
- Workspace-owned Rust crates live under
crates/and are picked up by the rootCargo.tomlviacrates/*. - Run
cargo build,cargo test, andcargo checkfrom the repo root to cover the shared workspace. make venv install-devcreates the root.venv, which is also reused by the workspace's PyO3/maturin builds.
# UV (faster)
uv venv && source .venv/bin/activate
uv pip install -e '.[dev]'

# pip
python3 -m venv .venv && source .venv/bin/activate
pip install -e ".[dev]"
Install the psycopg driver for PostgreSQL:
# Install system dependencies first
# Debian/Ubuntu: sudo apt-get install libpq-dev
# macOS: brew install libpq

uv pip install 'psycopg[binary]'   # dev (pre-built wheels)
# or: uv pip install 'psycopg[c]'  # production (requires compiler)
Connection URL format:
DATABASE_URL=postgresql+psycopg://user:password@localhost:5432/mcp
Quick Postgres container:
docker run --name mcp-postgres \
  -e POSTGRES_USER=postgres -e POSTGRES_PASSWORD=mysecretpassword \
  -e POSTGRES_DB=mcp -p 5432:5432 -d postgres
Upgrading
For upgrade instructions, migration guides, and rollback procedures, see:
- Upgrade Guide — General upgrade procedures
- MIGRATION.md — Breaking changes and step-by-step upgrade instructions
- CHANGELOG.md — Version history and breaking changes
Configuration
⚠️ If any required
.envvariable is missing or invalid, the gateway will fail fast at startup with a validation error via Pydantic.
Copy the provided .env.example to .env and update the security-sensitive values below.
🔐 Required: Set Before Starting
These variables must be set before the gateway will start. There are no usable defaults — the application fails at startup if these are missing or placeholder values:
| Variable | Description | How to generate |
|---|---|---|
JWT_SECRET_KEY |
HMAC secret for signing JWTs (32+ chars) | python3 -m mcpgateway.scripts.init_secrets |
AUTH_ENCRYPTION_SECRET |
Passphrase for encrypting stored credentials | python3 -m mcpgateway.scripts.init_secrets |
These variables have insecure defaults and should be changed before production use:
| Variable | Description | Default |
|---|---|---|
BASIC_AUTH_USER |
Username for HTTP Basic auth | admin |
BASIC_AUTH_PASSWORD |
Password for HTTP Basic auth | required — no default; set via make init-secrets-patch-env |
PLATFORM_ADMIN_EMAIL |
Email for bootstrap admin user | [email protected] |
PLATFORM_ADMIN_PASSWORD |
Password for bootstrap admin user | required — set a strong value before first run |
PLATFORM_ADMIN_FULL_NAME |
Display name for bootstrap admin | Admin User |
🔒 Security Defaults (Secure by Default)
These settings are enabled by default for security—only disable for backward compatibility:
| Variable | Description | Default |
|---|---|---|
REQUIRE_JTI |
Require JTI claim in tokens for revocation support | true |
REQUIRE_TOKEN_EXPIRATION |
Require exp claim in tokens | true |
PUBLIC_REGISTRATION_ENABLED |
Allow public user self-registration | false |
🛡️ Content Security
Content size limits prevent DoS attacks and ensure system stability:
| Variable | Description | Default |
|---|---|---|
CONTENT_MAX_RESOURCE_SIZE |
Maximum resource content size (bytes) | 102400 (100KB) |
CONTENT_MAX_PROMPT_SIZE |
Maximum prompt template size (bytes) | 10240 (10KB) |
Note: Size limits apply only to new create/update operations. Existing content is not retroactively validated.
🌐 UAID Cross-Gateway Routing Security
UAID Security Configuration
Production Requirements:
Cross-gateway UAID routing requires explicit security configuration:
-
Configure Domain Allowlist:
UAID_ALLOWED_DOMAINS=["gateway1.example.com", "gateway2.example.com"] -
Ensure JWT Trust:
- Both gateways must trust the same JWT issuer
- Option A: Shared secret (same
JWT_SECRET_KEYon all gateways) - Option B: Federated SSO (Google, GitHub, Entra ID)
-
Enable Authentication:
AUTH_REQUIRED=true
UAID_FORWARD_AUTH=true
Authentication Flow:
Cross-gateway calls forward the user's bearer token via the Authorization header.
Remote gateways validate tokens through existing auth middleware, preserving RBAC context.
Security Features:
- ✅ Fail-closed default: Empty allowlist blocks all cross-gateway routing
- ✅ Bearer token forwarding: User authentication preserved across hops
- ✅ Audit trail: Source gateway and user tracked in headers
- ✅ Clear error messages: Misconfigurations caught at startup and runtime
Troubleshooting:
- "UAID_ALLOWED_DOMAINS not configured" error: Add trusted domains to allowlist in .env
- 401/403 from remote gateway: Verify both gateways trust same JWT issuer
- "proceeding without authentication token" warning: Check auth middleware extracts token to
request.state.bearer_token
For detailed security architecture, see docs/security/uaid-cross-gateway-auth.md.
⚙️ Project Defaults (Dev Setup)
These values differ from code defaults to provide a working local/dev setup:
| Variable | Description | Default |
|---|---|---|
HOST |
Bind address | 0.0.0.0 |
MCPGATEWAY_UI_ENABLED |
Enable Admin UI dashboard | true |
MCPGATEWAY_ADMIN_API_ENABLED |
Enable Admin API endpoints | true |
DATABASE_URL |
SQLAlchemy connection URL | sqlite:///./mcp.db |
SECURE_COOKIES |
Set false for HTTP (non-HTTPS) dev |
false |
📚 Full Configuration Reference
For the complete list of 300+ environment variables organized by category (authentication, caching, SSO, observability, etc.), see the Configuration Reference.
Running
Quick Reference
| Command | Server | Port | Database | Use Case |
|---|---|---|---|---|
make dev |
Uvicorn | 8000 | SQLite | Development (single instance, auto-reload) |
make serve |
Gunicorn | 4444 | SQLite | Production single-node (multi-worker) |
make serve-ssl |
Gunicorn | 4444 | SQLite | Production single-node with HTTPS |
make compose-up |
Docker Compose + Nginx | 8080 | PostgreSQL + Redis | Full stack (3 replicas, load-balanced) |
make compose-sso |
Docker Compose + Keycloak | 8080 / 8180 | PostgreSQL + Redis | Local SSO testing (Keycloak profile) |
make testing-up |
Docker Compose + Nginx | 8080 | PostgreSQL + Redis | Testing environment |
Development Server (Uvicorn)
make dev                 # Uvicorn on :8000 with auto-reload and SQLite
# or
./run.sh --reload --log debug --workers 2
run.shis a wrapper arounduvicornthat loads.env, supports reload, and passes arguments to the server.
Key flags:
| Flag | Purpose | Example |
|---|---|---|
-e, --env FILE |
load env-file | --env prod.env |
-H, --host |
bind address | --host 127.0.0.1 |
-p, --port |
listen port | --port 8080 |
-w, --workers |
gunicorn workers | --workers 4 |
-r, --reload |
auto-reload | --reload |
Production Server (Gunicorn)
make serve               # Gunicorn on :4444 with multiple workers
make serve-ssl           # Gunicorn behind HTTPS on :4444 (uses ./certs)
Docker Compose (Full Stack)
make compose-up          # Start full stack: PostgreSQL, Redis, 3 gateway replicas, Nginx on :8080
make compose-sso         # Start SSO stack with Keycloak on :8180
make sso-test-login      # Run SSO smoke checks (providers + login URL + test users)
make compose-logs        # Tail logs from all services
make compose-down        # Stop the stack
Manual (Uvicorn)
uvicorn mcpgateway.main:app --host 0.0.0.0 --port 4444 --workers 4
Cloud Deployment
ContextForge can be deployed to any major cloud platform:
| Platform | Guide |
|---|---|
| AWS | ECS/EKS Deployment |
| Azure | AKS Deployment |
| Google Cloud | Cloud Run |
| IBM Cloud | Code Engine |
| Kubernetes | Helm Charts |
| OpenShift | OpenShift Deployment |
For comprehensive deployment guides, see Deployment Documentation.
API Reference
Interactive API documentation is available when the server is running:
- Swagger UI — Try API calls directly in your browser
- ReDoc — Browse the complete endpoint reference
Quick Authentication:
# Read JWT_SECRET_KEY from your .env (it must already contain a real secret)
export JWT_SECRET_KEY=$(grep '^JWT_SECRET_KEY=' .env | cut -d= -f2)

# Generate a JWT token
export TOKEN=$(python3 -m mcpgateway.utils.create_jwt_token \
  --username [email protected] --exp 10080 --secret "$JWT_SECRET_KEY")

# Test API access
curl -H "Authorization: Bearer $TOKEN" http://localhost:4444/health
For comprehensive curl examples covering all endpoints, see the API Usage Guide.
Testing
make test            # Run unit tests
make lint            # Run all linters
make doctest         # Run doctests
make coverage        # Generate coverage report
See Doctest Coverage Guide for documentation testing details.
Project Structure
mcpgateway/          # Core FastAPI application
├── main.py          # Entry point
├── config.py        # Pydantic Settings configuration
├── db.py            # SQLAlchemy ORM models
├── schemas.py       # Pydantic validation schemas
├── services/        # Business logic layer (50+ services)
├── routers/         # HTTP endpoint definitions
├── middleware/      # Cross-cutting concerns
└── transports/      # SSE, WebSocket, stdio, streamable HTTP

tests/               # Test suite (7,000+ tests)
docs/docs/           # Full documentation (MkDocs)
charts/              # Kubernetes/Helm charts
plugins/             # Plugin framework and implementations
mcp-servers/         # Sample/test MCP servers (see note below)
Note: The
mcp-servers/directory contains unsupported sample and test servers, most originating from community contributions, provided for demonstration and integration testing purposes only. They generally lack session management, persistent state, multi-tenancy, authentication, and other production concerns. They do not go through the same review, testing, and security rigor as the core ContextForge codebase and should not be run in production.Security: Never run untrusted MCP servers directly on your local filesystem. Always use a sandbox, container, or microVM (e.g. gVisor, Firecracker) with restricted capabilities. Exercise caution when registering any remote MCP server, including servers from public catalogs — perform your own security evaluation before granting access to your gateway.
For complete structure, see CONTRIBUTING.md or run tree -L 2.
Development
make dev             # Dev server with auto-reload (:8000)
make test            # Run test suite
make lint            # Run all linters
make coverage        # Generate coverage report
Run make to see all available targets.
For development workflows, see:
- **[Developer Workstation Setup](https://ibm.github.io/m
No comments yet
Be the first to share your take.